

Materials & Tools
Wood: Seasoned white oak (or green oak for more warping drama).
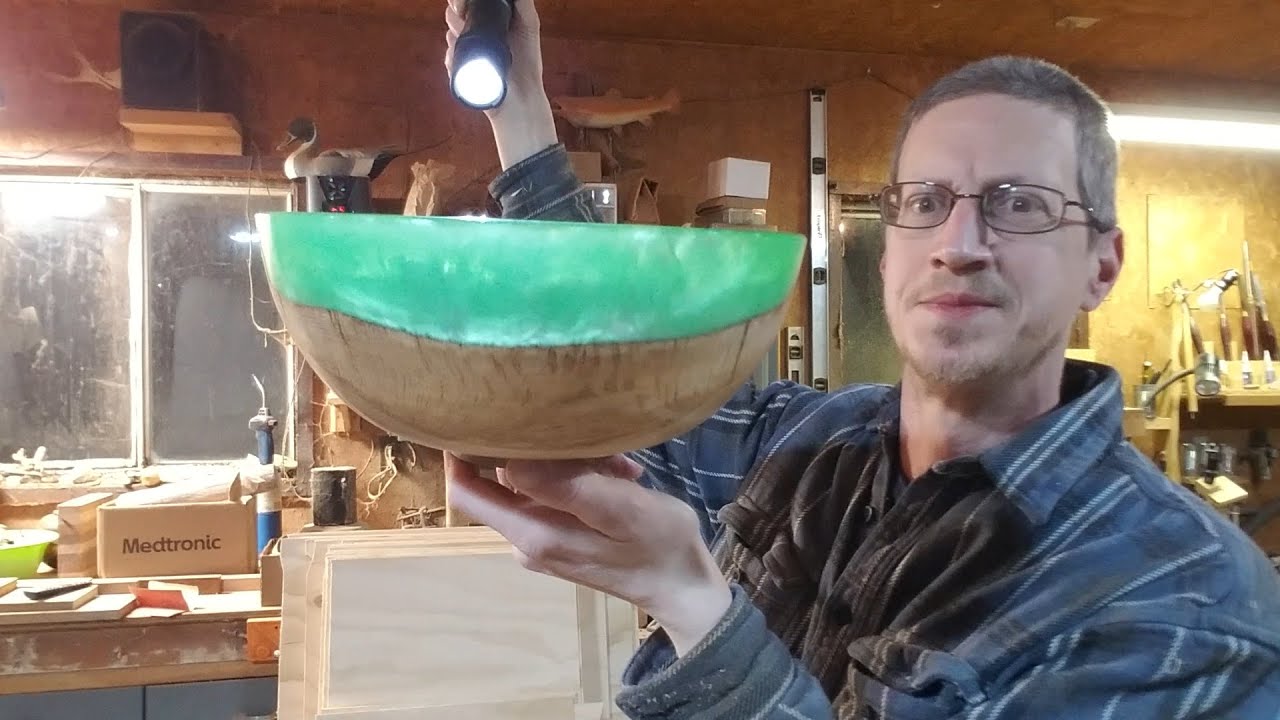
Resin: Deep pour epoxy (colored with emerald green mica powder or translucent dye).
Stabilizing: CA glue or thin epoxy for cracks.
Tools: Bowl gouge, carbide scraper, sander (80–600 grit), pressure pot (optional for bubble-free resin).
Step-by-Step Process
1. Preparing the Blank
Select a Knot or Crack: Choose a bowl blank with a natural fissure, bark inclusion, or void for resin filling.
Stabilize Weak Areas: Soak punky spots with thin CA glue or epoxy to prevent tear-out.
Mount Securely: Use a screw chuck or faceplate, ensuring the defect is accessible for resin.
2. Rough Turning
Shape the Exterior: Turn a classic bowl form (flared sides work well for resin "rivers").
Hollow the Interior: Leave walls 10–12mm thick (resin adds strength).
Carve Channels (Optional): Use a Dremel to widen cracks artistically for more resin volume.
3. Resin Pour
Masking Tape Barrier: Seal the bowl’s edges to prevent leaks.
Mix Resin: Add green pigment (mix translucent + opaque for depth).
Pour Slowly: Fill voids in layers if deep (to avoid overheating).
Pressure Pot (Ideal): Eliminate bubbles for glass-like clarity.
Cure: Let harden 24–48 hours.
4. Final Turning
Remount & Re-turn: Shape the resin-wood blend smoothly (carbide tools reduce chipping).
Refine Curves: Soften transitions between wood and epoxy.
Sand Progressively: 120 → 600 grit, then micro-mesh for a satin sheen.
5. Finishing Touches
Oil the Wood: Tung oil enhances oak’s ray fleck patterns.
Polish Resin: Buff with plastic polish for a wet look.
Wax for Unity: Apply a beeswax blend to unify the surfaces.
Design Variations
"Forest Pool": Blue-green resin with blackened cracks (vinegar/steel wool stain).
"Fossilized Oak": Embed crushed turquoise or gold leaf in epoxy.
"Split Cascade": Pour resin along a dramatic off-center crack.
Pro Tips
🔥 Torch Bubbles – A quick pass with a heat gun removes surface bubbles.
🌳 Emulate Nature – Mimic the irregularity of water-worn wood in your shaping.
⚠️ Safety First – Wear a respirator when sanding resin.
.jpg)
.jpg)
.jpg)


